This step prepares the plans and materials needed to carry out
the learning intervention.
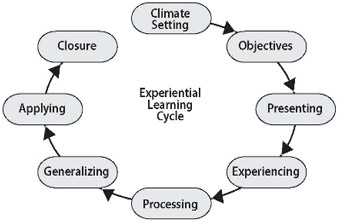
| Box 18: The
experiential learning cycle |
Derived from evidence-based principles of learning, the
Experiential Learning Cycle provides practical quidance
about designing lessons. Training and learning that is
designed in accordance with the Experiential Learning
Cycle:
1) is linked to real life
2) encourages the learners to express their feelings and
opinions and draw on their own prior knowledge and
experience
3) integrates evaluation methods that provide immediate
feedback to learners about their progress.
The guidance in the Experiential Learning Cycle applies to
both the intervention as a whole and to the individual
lessons and activities. The principles described in the
Experiential Learning Cycle are applicable regardless of
the learning approaches used.
|
Step 1. Climate Setting/Introduction
- Stimulates interest and curiosity. Prompts learners
to begin thinking about the subject that is being
introduced.
- Helps learners understand why the subject is
important to them, how it will be useful and what
relevant experience and skills they bring to the learning
intervention as a whole or to a specific learning
activity. Information collected during Learning for
Performance Step 3 is useful in tailoring learning
activities to closely match the learners' interests and
needs. Recognition of relevant experience, skills and
accomplishments can be highly motivating for learners,
especially when it's woven into subsequent elements of
the learning experience.
|
Step 2. Objectives
- Tells the learners what they will be able to do as a
result of participating in the learning intervention or
activity. At this stage, learners should develop a clear
understanding of how the learning objectives relate to
performance expectations at the work site.
- Gives learners an opportunity to relate the
objectives of the learning intervention or activity to
their individual job requirements and work-site
conditions. Links learning objectives to previous
sessions.
|
Step 3. Interactive Presentation
- Presents content using relevant examples; poses
questions to learners; supplements explanations with
visual aids and summaries to highlight key points.
- Provides a framework for learners--either a theory
or a model--that becomes the basis for the experience
that follows.
|
Step 4. Experiencing
- Provides an opportuninty to encounter a situation
derived from the objective of the training (e.g.,
skit/drama, role plays, case studies, critical incident,
video, small group task/exercise, site/field visit using
a checklist to observe a demonstration of procedures).
Becomes the common source of learning that learners will
share and is the event that will be analyzed during the
rest of the lesson.
- Provides learners an opportunity to practice what
they have learned in an actual or simulated work
setting.
|
Step 5. Processing/Getting Immediate
Reactions
- Solicits reactions from the learners about their
individual experiences and challenges them to think about
what they learned.
- Gives learners an opportunity to reflect on their
accomplishments and receive feedback on their
progress.
|
Step 6. Generalizing
- Learners link what they have learned to the session
objectives.
- Learners identify key learning.
|
Step 7. Applying
- Using the insights and conclusions gained from the
previous steps, the learners identify and share how:
- the learning applies to actual work
situations
- they will use the learning in their work
situations to close the performance gap.
- Encourages learners to develop and use an action plan
and make specific arrangements for how new skills and
knowledge will be used.
- Answers the learners' questions: "Now what?" and "How
can I use what I learned?"
- Encourages the learners to consider the implications
of what happens in their work situation if they do not
effectively apply what they have learned, i.e.,
consequences of performance errors.
|
Step 8. Closure
- Summarizes the events of the learning intervention or
activity.
- Links training events to job-related objectives and
determines if objectives have been met.
- Links learning objective to the rest of learning
intervention, especially upcoming sessions.
- Thanks learners for their participation and
contribution. Ensures them of your availability for any
other questions after the session.
|
| Adapted
from: Training Resources Group, Inc. and University
Associates (see References and Resources) |